Sorry, no results found for "".
General concepts > Project Templates
DatoCMS allows you to turn an existing project into a ready-to-clone public template project allowing anyone to bootstrap a new project based off of yours.
In this guide you will learn how to make a project public and how to create and configure a clone and deploy link or button to share your project.
Turn a project into a public template
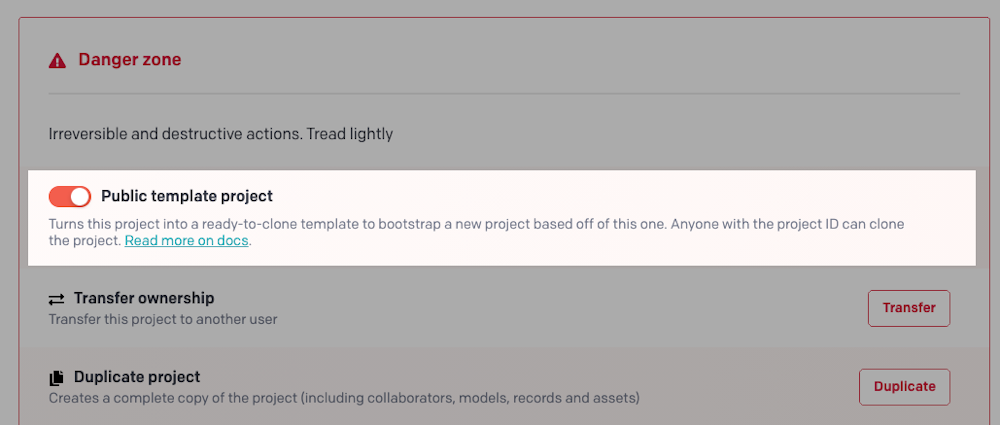
Since projects might contain sensitive information they are all private by default. To make a project public, head to the project main page in the DatoCMS dashboard and switch on the Public template project option in the Danger Zone section.
Important: From now on anyone will be able to clone the project, so make sure it doesn't contain any sensitive information!
Once you've set your project to be a public template, you can then generate:
A "Clone project" button to perform a complete clone of an existing DatoCMS project, or
A "Project starter" button, to clone a project AND deploy a frontend capable of reading the content coming from the project itself.
Generate a "Clone project" button
The "Clone project" button helps users perform a complete clone of an existing DatoCMS project. Once clicked, they will see the following dialog, and at the end of the process a copy of the original project will be available on their dashboard:

Use the form below to generate a ready-to-use clone button (the project ID can be retrieved inside the details page of the project):
Use the following code to share the button on your README file or documentation:

Generate a "Project Starter" button
Most of the time, a DatoCMS project is associated with a frontend project (website, application, etc.) that knows how to query for its content, and renders the result in a pleasant way to users. The "Project starter" button helps users deploy new sites from templates with one single click, performing the following actions for them:
Clone a DatoCMS template project and put the copy inside the user account;
Fork a Git repository containing the frontend project inside the Github account of the user;
Build and publish the frontend online using a free hosting solution (Netlify, Vercel, Heroku, etc.)
Check out our Marketplace to see a fine selection of Project Starters.

Project Starters are composed of a DatoCMS template project, plus a Git repository containing a datocms.json configuration file that specifies both presentational metadata (name, preview image, URL of an example of a successful deployment) and the information necessary for creating a new project.
You can use the form below to generate a datocms.json configuration file and a button to share the starter with the world:
Result
Copy the following code and add it to your Git repository in a file called datocms.json:
{
  "name": "THIS FIELD IS MANDATORY. PLEASE PROVIDE A VALUE!",
  "description": "THIS FIELD IS MANDATORY. PLEASE PROVIDE A VALUE!",
  "previewImage": "THIS FIELD IS MANDATORY. PLEASE PROVIDE A VALUE!",
  "datocmsProjectId": "THIS FIELD IS MANDATORY. PLEASE PROVIDE A VALUE!",
  "deploymentType": "copyRepo",
  "environmentVariables": {}
}
Use the following code to share the button on your README file or documentation:
[](https://dashboard.datocms.com/deploy?repo=YOUR-GITHUB-REPO)
Project ID
The project ID can be retrieved inside the details page of the project in your Dashboard:

Supported deployment methods
The deploymentType setting allows you to configure what deployment target can be used during the cloning process. By setting this value to copyRepo, DatoCMS will clone the template on a repository in the user org or account.
Additionally, DatoCMS supports the following deployment types:
vercelnetlifystatic(user can choose between Vercel and Netlify)heroku
When one of these is chosen, users will be asked to authenticate on the service and therefore they need an active and valid account. Once authorized, the DatoCMS integration will deploy the template repository to the service.
Build command
When the deployment type is either static, vercel, netlify or heroku, you must specify the build command that will be run during the deployment of the frontend repository. DatoCMS will forward the buildCommand to the deployment service which will use it to build the application.
Environment variables
When the deployment type is either static, vercel, netlify or heroku, you can specify a number of environment variables that will be configured on the hosting platform, before building the actual frontend. The value of each environment variable can be either:
A custom string
The URL of the cloned DatoCMS project (ie.
https://<YOUR_PROJECT>.admin.datocms.com/)One of the DatoCMS API tokens present in the template project (you need to specify the name of the API token, ie. "Read-only API token")
Post-deploy install URL
When the deployment type is either static, vercel, or netlify, you can call a custom hook present in the frontend to add more complex configuration steps.
The hook must support CORS for the https://dashboard.datocms.com Origin, and will receive a POST request.
If the frontend is deployed to Netlify, the HTTP request body will be the following:
{ "datocmsApiToken": <DATOCMS_READWRITE_API_TOKEN>, "integrationInfo": { "adapter": "netlify", "netlifySiteId": <NETLIFY_API_TOKEN>, "netlifyToken": <NETLIFY_API_TOKEN>, },}If the frontend is deployed to Vercel, the HTTP request body will be the following:
{ "datocmsApiToken": <DATOCMS_READWRITE_API_TOKEN>, "integrationInfo": { "adapter": "vercel", "vercelApiToken": <VERCEL_API_TOKEN>, "vercelTeamId": <VERCEL_TEAM_ID>, "vercelProjectId": <VERCEL_PROJECT_ID>, },}