React ecommerce tutorial
How To Build an Ecommerce Application in React With Snipcart
This is a step-by-step tutorial to develop an ecommerce website in React and Snipcart and start selling your products online right away. It contains an example that you can clone and an out-of-the-box installation.
Why an ecommerce?
The ecommerce is one of the most common React web application a developer can be asked to build. Here’s why knowing how to properly craft an ecommerce application from the ground up can be considered a crucial skill. Over the last few years, several libraries have been built to help developers reach this goal effortlessly.
Specifically, Snipcart is the solution you are looking for. Not only does it allow you to set up an ecommerce in a few minutes, but it is also a secure, reliable, and advanced solution.
Read this article instead, if you want to build a Next.js ecommerce.
Test the ecommerce now
If you don't want to read the whole article and just want to get started, you can install this project on your DatoCMS account right away, by clicking on the button. This action will
Clone a GitHub repo with a fully working example of a simple ecommerce, written in React and Typescript.
Copy our DatoCMS template project to your DatoCMS account.
Deploy on Vercel or Netlify your newly created ecommerce.

Otherwise, let's get started with the React ecommerce tutorial !
What is React
React at the moment represents of the most popular JavaScript libraries. This open-source, frontend library is based on composition, and it relies on countless reusable components put together to build the desired user interface. It was coded with the MVC (Model View Controller) design pattern in mind, and it is supported by millions of reliable and easy-to-adopt npm JavaScript libraries. This is what makes React so powerful. In fact, thanks to them, you can achieve any goal quickly and with no effort.
React has become more and more used in the developer community thanks to the frameworks built around it. Find out more about possible integrations as Next.js CMS, Gatsby CMS or Remix CMS.
What is Snipcart
Snipcart is an easy-to-install, easy-to-adopt, powerful JavaScript and HTML shopping cart platform. It is one of the most popular tools that allows you to add to your web application the e-commerce features the end-users expect. It offers a great deal of customization, you can easily change its look & feel by defining custom CSS rules. Moreover, Snipcart comes with an open-to-anyone back-office management platform that allows you to track the data on the sales you made thanks to it. Thus, Snipcart represents the ultimate JavaScript library to add a shopping cart to your web application with minimal effort.
What is DatoCMS
DatoCMS is a headless CMS in charge of delivering your ecommerce data and products in a fast and reliable way. It is widely used by agencies and major brands to manage and deliver content worldwide.
React ecommerce - Prerequisites
Be sure to meet all the prerequisites necessary to start with this React ecommerce tutorial:
Node.js 17+ and npm 5.2+ and higher
Snipcart >= v3.2.0
Developing an Ecommerce Application
You can clone the GitHub repository that supports the article or try our React, Snipcart and DatoCMS demo by installing our React template.
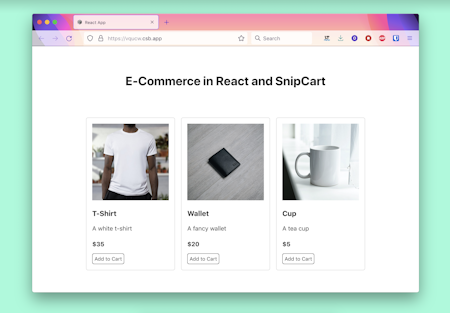
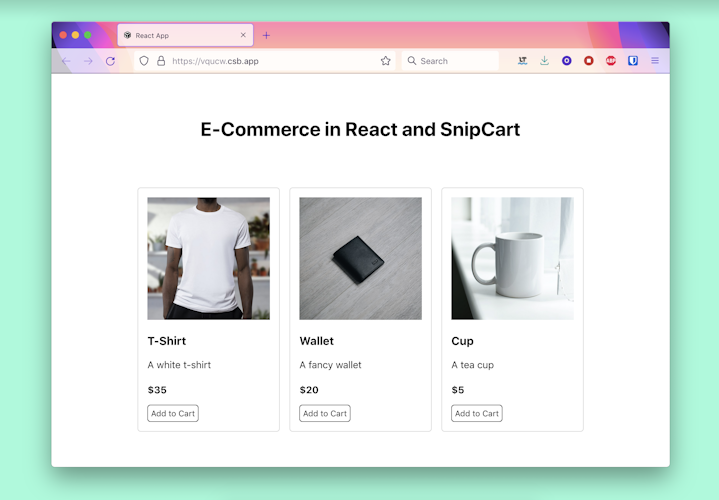
This is the final application we will build:

On your local machine, you can launch the following commands:
git clone https://github.com/Tonel/ecommerce-demo-react-snipcartcd ecommerce-demo-react-snipcartnpm inpm start
Otherwise, follow this step-by-step tutorial and learn how to build the same ecommerce application in React.
1. Initializing a React Ecommerce Project
You can easily generate an empty project in React by using Create React App. This represents the officially supported way to create a working single-page React application from scratch. Use this tool to initialize a project called ecommerce-demo-react-snipcart by launching the following command:
npx create-react-app ecommerce-demo-react-snipcartYou should now be able to see the following file structure inside the ecommerce-demo-react-snipcart folder:
ecommerce-demo-react-snipcart├── README.md├── node_modules├── package.json├── .gitignore├── public│ ├── favicon.ico│ ├── index.html│ ├── logo192.png│ ├── logo512.png│ ├── manifest.json│ └── robots.txt└── src ├── App.css ├── App.js ├── App.test.js ├── index.css ├── index.js ├── logo.svg ├── reportWebVitals.js └── setupTests.jsThis is what a blank React project looks like. Now, enter the ecommerce-demo-react-snipcart folder and start the application with these commands:
cd ecommerce-demo-react-snipcartnpm run startA local server should now be serving your React application. Verify this by reaching the http://localhost:3000/ page in your browser and making sure you see the default Create React App screen below:
2. Installing Snipcart
Let’s now see how to integrate Snipcart into your React application. First, subscribe to Snipcart through their official website. If you do not have a Snipcart account, create a new one for free here. Otherwise, sign in here. Second, add the Snipcart dependencies to your web application. As stated in the official documentation, you have to add the Snipcart JavaScript and CSS files to your public/index.html file. This represents the only HTML page your React application consists of. In detail, what you need to do is add the following lines at the end of the <head> element:
<link rel="preconnect" href="https://app.Snipcart.com" /><link rel="preconnect" href="https://cdn.Snipcart.com" /><link rel="stylesheet" href="https://cdn.Snipcart.com/themes/v3.2.2/default/Snipcart.css"/>
The first two lines are not strictly mandatory but will the browser connect to the Snipcart subdomains faster and save time. On the other hand, the last line import the Snipcart CSS file the library depends on.
Third, add the Snipcart JavaScript dependency to your ecommerce application. Just like before, make sure to paste the following line of codes at the end of the <body> HTML element of your public/index.html file:
<script src="https://cdn.Snipcart.com/themes/v3.2.2/default/Snipcart.js" async/>
This is what your final public/index.html file should look like:
<!DOCTYPE html><html lang="en"> <head> <meta charset="utf-8" /> <link rel="icon" href="%PUBLIC_URL%/favicon.ico" /> <meta name="viewport" content="width=device-width, initial-scale=1" /> <meta name="theme-color" content="#000000" /> <meta name="description" content="Web site created using create-react-app" /> <link rel="apple-touch-icon" href="%PUBLIC_URL%/logo192.png" /> <link rel="manifest" href="%PUBLIC_URL%/manifest.json" /> <link rel="preconnect" href="https://app.snipcart.com" /> <link rel="preconnect" href="https://cdn.snipcart.com" /> <link rel="stylesheet" href="https://cdn.snipcart.com/themes/v3.2.2/default/snipcart.css" /> <title>React Ecommerce App</title> </head> <body> <noscript>You need to enable JavaScript to run this app.</noscript> <div id="root"></div> <script src="https://cdn.snipcart.com/themes/v3.2.2/default/snipcart.js" async ></script> </body></html>3. Developing a Product Component
Let’s build a Product component aimed at showing the product or service to sell and connect it to Snipcart.
export default function Product(props) { const {id, imageUrl, name, description, price} = props
return ( <div key={id} className={"product"} > <img src={imageUrl} alt={`Image of ${name}`} className={"image-product"} /> <h3>{name}</h3> <p>{description}</p> <span>${price}</span> <div> <button className="snipcart-add-item" data-item-id={id} data-item-image={imageUrl} data-item-name={name} data-item-url="/" data-item-price={price} > Add to Cart </button> </div> </div> );}
As you can see, a product requires an id, a name, a description, an image, and a price. But what you should focus on here is the “Add to Cart” <button>. In particular, pay attention to its attributes. They represent what Snipcart uses to add your products to its shopping cart. This is where the magic happens! In other terms, they are the only things you have to take into account while connecting your products to the Snipcart shopping cart feature. If you want to learn more about how this actually works, read this.
This component is all you need to implement an ecommerce application with Snipcart. Let’s see how.
4. Putting It All Together
Let’s make the ecommerce application work. First, make sure to load all the products you want to sell and showcase them through the Product component. To achieve this, let’s overwrite the App.js file as follows:
import "./index.css"import "./App.css"import products from "./assets/products.json"import Product from "./components/Product";
export default function App() { return ( <div className={"container"}> <main className={"main"}> <h1> E-Commerce in React and SnipCart </h1>
<div className={"grid"}> { products.map((product, i) => <Product {...product} key={i}/>) } </div> </main> <div id="snipcart" data-api-key="NWMwZWNkZGMtZjU2ZS00YzM3LWFlZjYtMmM5Zjk0MWViZDcxNjM3Njg0OTY0ODg5NTk4MTM3" hidden > </div> </div> );}This represents the first and only page this ecommerce web application consists of.
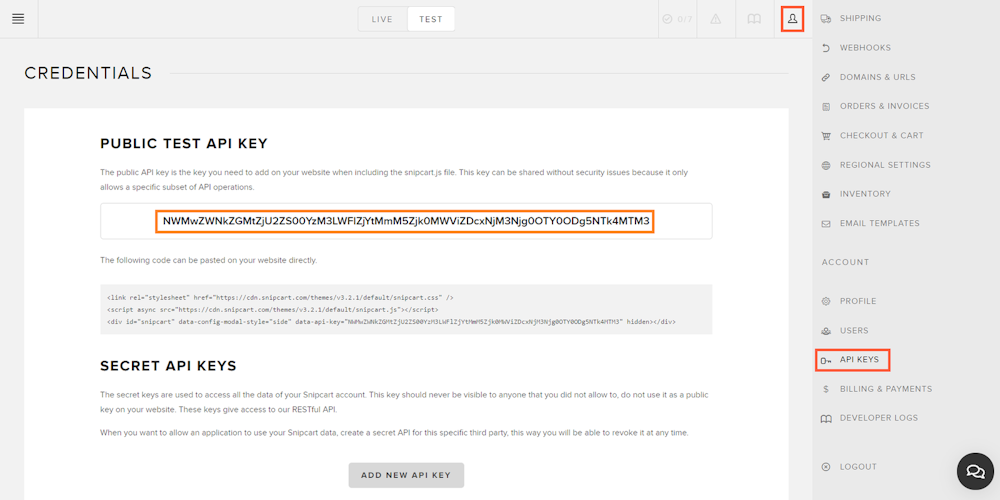
Then, focus on the hidden <div> placed at the end of the page component. That is nothing more than what Snipcart needs to show the shopping cart. To make it work, you need a valid Snipcart API key here. Retrieve one by logging in into the Snipcart platform, reaching the setting menu, and clicking on “API KEYS” as shown below:

Then replace YOUR_SNIPCART_API_KEY with that value, as follows:
<div id="Snipcart" data-api-key="NWMwZWNkZGMtZjU2ZS00YzM3LWFlZjYtMmM5Zjk0MWViZDcxNjM3Njg0OTY0ODg5NTk4MTM3" hidden></div>
Follow this link from the Snipcart official documentation if you encounter any problems in this procedure.
Now, whenever a user clicks on the “Add to Cart” button, the selected product will be automatically added to the Snipcart shopping cart. Then, Snipcart will give them the opportunity to pay. The only thing you need to make this last feature work is to integrate a payment system. Set up and connect one of the many payment gateways supported by Snipcart, and your ecommerce is ready to make money!
This was easy, but this application has a major drawback. The ecommerce web application just built entirely relies on a products.json file we created manually to store all the products’ information.
[ { "id": "t-shirt", "name": "T-Shirt", "price": 35.0, "imageUrl": "https://www.datocms-assets.com/56262/1633338865-shirt.jpg", "description": "A white t-shirt", "url": "/api/products/halfmoon" }, { "id": "wallet", "name": "Wallet", "price": 20.0, "imageUrl": "https://www.datocms-assets.com/56262/1633338869-fancy-wallet.jpg", "description": "A fancy wallet", "url": "/api/products/wallet" }, { "id": "cup", "name": "Cup", "price": 5.0, "imageUrl": "https://www.datocms-assets.com/56262/1633338802-cup.jpg", "description": "A tea cup", "url": "/api/products/veiltail" }]
Not surprisingly, you cannot base your application on such a file. Such a choice would prevent your application from being scalable and reliable. This is why more and more companies opt for an advance, yet easy-to-integrate, headless CMS to manage products data.
Content Management to the Next Level with DatoCMS
DatoCMS is one of the best solutions when you want to build an ecommerce and manage its content. Particularly, it comes with performant APIs (based on GraphQL and REST) to retrieve the required products info in milliseconds. It also offers a super user-friendly interface and by making your ecommerce application communicate with DatoCMS, you will be able to address the content management issue presented above.
When compared to its competitors, DatoCMS stands out thanks to its data validation feature. This allows you to be sure that what is online is always safe and as planned.
So, feel free to adopt DatoCMS and retrieve all the products defined by your content generation team with no effort.
Getting started with DatoCMS and React is easy. Follow this link from the official documentation to learn more about it. Keep in mind that a headless CMS offers several other interesting features. Find them all here.
React ecommerce template
Start with one click by installing our React ecommerce template starter.

Build a React ecommerce - Conclusion
In this React ecommerce tutorial, we learned how to build an ecommerce single-page application in React. Knowing how to achieve this is crucial these days.
Luckily, many libraries have been built to help developers build ecommerce applications from scratch with zero effort. Snipcart is one of those, and it perfectly supports React, as we have just seen. So, keeping the products or services on sale info up to date is the real challenge here. In fact, anyone should be able to do that, not only developers.
Thankfully, DatoCMS exists, and it is here to make content management easy and stress-free.
Thanks for reading! We hope that you found this article helpful. Feel free to reach out to us on Twitter with any questions, comments, or suggestions.
If you want to build an ecommerce using a React based static site generator, you can check out our Gatsby ecommerce tutorial, or Next.js ecommerce tutorial
- Why an ecommerce?
- Test the ecommerce now
- What is React
- What is Snipcart
- What is DatoCMS
- React ecommerce - Prerequisites
- Developing an Ecommerce Application
- 1. Initializing a React Ecommerce Project
- 2. Installing Snipcart
- 3. Developing a Product Component
- 4. Putting It All Together
- Content Management to the Next Level with DatoCMS
- React ecommerce template
- Build a React ecommerce - Conclusion


